Right now I'm loving Oxfords on women; partly because I have to wear all black to work, so they are a great comfortable, all-black, footwear option for myself. I think they work best with full-length or cropped skinny dress pants (sock-less of course).
I had multiple bronzer compacts that either had cracked pressed powder, or were simply worn out in the center. This was ultimately making for a useless compact. I decided to do a Google search to see if I could do anything for them. I found this post by Lauren Conrad's Beauty Department called DIY Makeup Fixer Upper. This post explains step-by-step how to make them almost brand new.
I'm using a Victoria's Secret and a Wet n Wild face bronzer.
The Beauty Deparment's post calls for: 70% alcohol, plastic wrap, eyeliner brush, spatula, and a dropper.
I decided to improvise when it came to gathering materials. I ended up using: lemon-flavored vodka, a q-tip, and a spoon.
I skipped the plastic wrap and just went to town mashing up my compact powder with a q-tip. (I removed the cotton from each end before-hand.) Careful, depending on how hard the powder is pressed it can jump around while you're trying to break it up.
Then I used the back of a spoon in a rocking motion to mash-up the make-up into a finer powder.
Carefully, I added small spoonfuls of the vodka to the compact, stirring with the q-tip in-between spoonfuls. I stopped adding the vodka when it became chunky and mousse-like.
Again, I used the back of the spoon to spread the mousse around to fill the bed of the compact.
There you have it! Mine probably took a few hours to dry (and mine smells lemony-fresh! ;) )
Essie's "Butler Please" is described on Essie.com as
...an indulgent bright blue ... indulge in a bright blue nail color hue that simply adores being waited on hand and foot. spa pedicure? yes, darling, yes.
Butler Please was part of Essie's Winter 2012 Leading Lady collection.
Christina here! This is a review of all of my favorite lipstick brands and shades that I have experimented with over the past year or so. I've gotten into lipsticks recently because I'm finding that they are less maintenance and upkeep when wearing them. They're not slick and sticky like glosses, but are more controllable. You can control the darkness/lightness of the color based upon your application.
Most of these colors I usually wear at night because they are pretty vibrant, so I feel more comfortable wearing them that time of day. I also like to layer them with a sheer balm or gloss to give it some extra shine.
This is a medium pink color with some sparkle. It has a slight lemony scent. This brand stays pretty moist and creamy without that chalky/dry feeling.
This balm has a minty scent. Its very easy to apply and is long-wearing. Even after the balm has been removed, my lips are slightly stained.
I really like this line of L'Oreal balms-- this is my second one. They are very wearable, sheer and glossy. I layered this with the nude gloss stick because I still wanted the nude color, but I find the gloss sticks to be a little dry, so I added some moisture.
This gloss stick is also layered with the L'Oreal balm for the same reasons. I love the bright pink color!
I love this color for the summer! I bought it when I had red hair and found that it really popped at night. I have some photographs of myself wearing this color, and I always get compliments on how pretty my lips look. Its more purple in person and has a light vanilla scent.
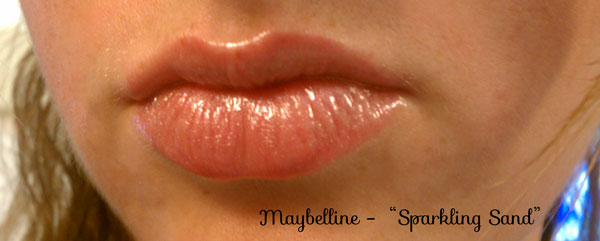
This Maybelline lipstick is also a repeat purchase. In the tube it looks very sparkly and frosty, but once on your lips it becomes pretty nude and pretty. I layered it with the L'Oreal balm afterwards to add some glossy moisture.
Most of these products you can find at your local drugstore (Maybelline, L'Oreal, Rimmel). The Pur Lip Gloss Sticks were purchased at Peebles department store around Christmas time, so you may still be able to find them in stores.
Recently I've been into pyramid stud jewelry, clothing and accessories. Pyramid studs are a perfect mix of glam, but also have a rough edge to them. They usually come in silver, gold and rose-tone, which can make them dressy but also casual. Studs can also be used for crafts projects, such as DIY studded denim cut-offs! Also check out the pyramid stud Pinterest galley! Below is a gallery of some of my favorites!
^ This is a really simple tutorial, similar to the process I go through on my own hair.
How to get those coveted beachy waves without stepping foot on the beach:
There are many, many ways to achieve this look; curling with a straightener, using a 3-barrel crimper, blow-drying twisted hair, etc.
I like to do this with towel-dry hair that is unbrushed. I find that if I don't brush it after my shower, I get a lot better waves. So be sure you get your desired part in the shower while conditioning!
In the summer, with the humidity, I especially like to use Garnier Fructis Sleek & Shine Anti-Humidity Smoothing Milk. I put a quarter size amount in my hand, and then run it through my damp, unbrushed hair before I add any spray.
My favorite method is using a curling spray, products I regularly use are Garnier Fructis Curl Shaping Spray Gel, Aussie Sprunch Hair Spray, and John Frieda Dream Curls. I find the Garnier spray gives a more 'crunchy' , piecey look, while the Aussie and John Frieda sprays are softer.
If you're looking for a more defined, neater look, once dry, I recommend using a clip-less curling iron, such as my 1" Infiniti by Conair. For a really piecey look, alternate directions you curl; both towards your face and away. Run your fingers or a wide-toothed comb through your curls to break them up.
Once I finish curling I smooth Aveda's Smooth Infusion through my hair, just to nicely coat my curls. This is basically an all-in-one product. Its good for humidity, static, smoothing, style-prep, etc.
Makeup brushes are probably the most important tools in your makeup bag—but most of us don’t take proper care of them.
But what good is your new killer eyeshadow or favourite bronzer if you don’t have the right tools to apply them?
Here are some tips on how to properly care for your brushes:
Storage Admit it – you leave your brushes rattling around inside an old zippered makeup bag. Or you leave them standing up in a jar on your bathroom counter. Neither of those are good options. The bristles can get damaged or transfer makeup residue in those bags, and the heat and moisture from your shower will decrease the lifespan of your brushes.
Instead, look for a roll-up bag that has different compartments for each brush, or, if you want to store them in a jar, keep them away from heat, moisture, and direct sunlight. A jar with a lid is also a good idea, as it will prevent dust from gathering in the bristles.
Cleaning Dirty brushes are not only built up with residue from your makeup, but also with oils and dead skin cells – all of which can create a breeding ground for bacteria and leave you with an ugly breakout on your face. Follow these steps to keep your brushes clean and bacteria-free.
1. Wash your brushes every two to three weeks. Brushes used to apply cream or liquid makeup should be washed daily. If someone else has used your brushes, wash them before you use them again.
2. To wash your brushes, spray or pour makeup cleanser onto a clean towel. Gently wipe each brush back and forth across the towel until there is no more makeup coming off the bristles.
Alternately, you can soak them in a sink filled with warm, soapy water (use your regular face cleanser or a mild shampoo). Rub the bristles under water to remove any build-up.
3. To dry, lay the brushes flat, with the brush head hanging over an edge. Not letting the brush drip-dry over an edge may cause moisture to build up where the brush head meets the handle and may shorten the lifespan of your brushes.
4. Let your brushes dry thoroughly (four to eight hours, depending on how thick the brush is) before using them again. Once dry, reshape the bristles as necessary.